
Introduction
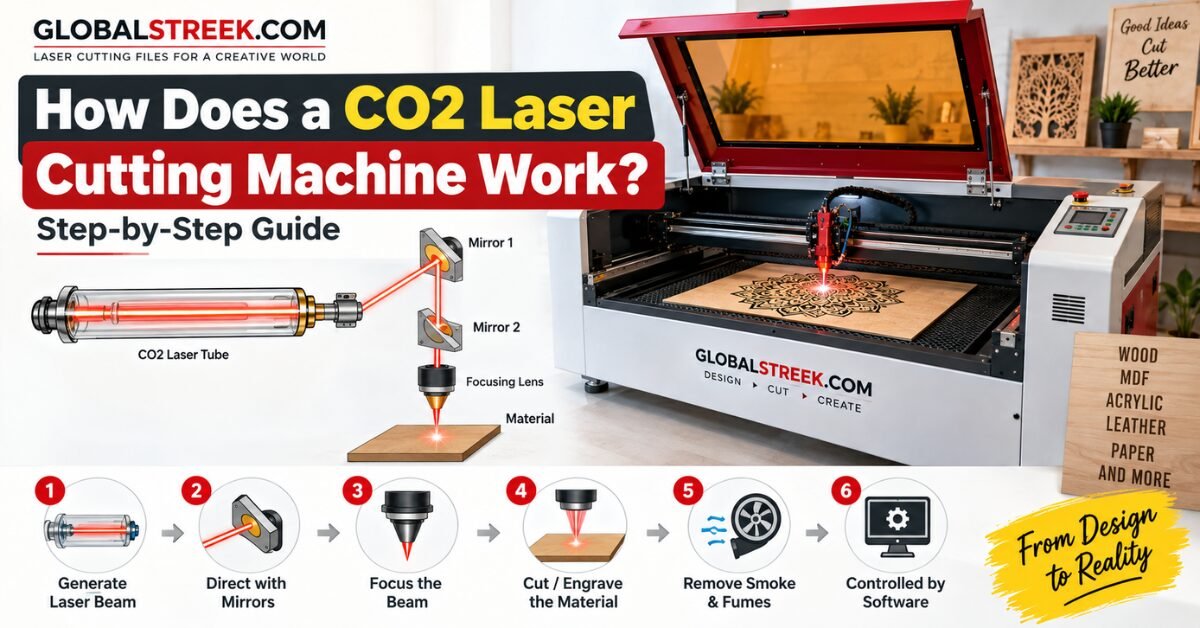
Many people know that a CO2 laser cutting machine can cut materials such as wood, acrylic, MDF, leather, and other non-metal materials with impressive precision. However, fewer people understand what actually happens inside the machine after they press the Start button.
The cutting process involves much more than simply producing a laser beam. Mechanical, electrical, optical, cooling, and control systems work together to turn a digital design into a precise physical cut. Each component has a specific role, from generating the laser beam to guiding and focusing it onto the material.
In this guide, you will learn how a CO2 laser cutting machine works step by step, from preparing the design to completing the final cut. The explanation uses simple language, making it useful for beginners as well as people who already work with laser machines.
Step 1: Creating the Design
Every laser cutting project starts with a digital design.
The operator creates or prepares the design using vector-based software such as CorelDRAW, Adobe Illustrator, AutoCAD, Inkscape, LightBurn, or other compatible design and CAD software.
A vector design uses paths, lines, curves, and shapes instead of relying only on pixels. These paths tell the laser software where the machine needs to move.
After creating the design, the operator imports it into compatible laser control software. The operator can then configure settings such as:
- Cutting or engraving mode
- Laser power
- Cutting speed
- Engraving speed
- Layer settings
- Number of passes
- Cutting order
At this stage, the machine has not started cutting. The operator is simply preparing the instructions that the machine will follow.
Step 2: The Controller Converts the Design into Machine Commands
Once the design and machine settings are ready, the laser controller takes over.
The controller acts as the central control system of the machine. It processes the job instructions and coordinates the movement of the laser head with laser firing.
Depending on the machine and controller, it can manage functions such as:
- X-axis movement
- Y-axis movement
- Laser ON/OFF timing
- Cutting speed
- Engraving speed
- Laser power
- Acceleration and deceleration
- Job sequence
- Home position
- Limit switches
The controller continuously coordinates the motion system and laser output. This synchronization allows the laser to fire at the correct position while the laser head follows the design.
Popular CO2 laser controllers include Ruida, Trocen, TopWisdom, and Leetro, although the exact features vary between models.
Step 3: The CO2 Laser Tube Generates the Laser Beam
When the operator starts the job, the laser power supply provides high voltage to the CO2 laser tube.
Inside a typical glass CO2 laser tube, a controlled gas mixture contains carbon dioxide, nitrogen, helium, and other gases depending on the tube design.
The electrical discharge excites the gas molecules inside the tube. Nitrogen helps transfer energy to carbon dioxide molecules, which then emit infrared radiation.
Typical CO2 lasers produce their main output at a wavelength of approximately 10.6 micrometers (µm).
The optical system inside the tube amplifies this light and produces a coherent laser beam.
The beam carries a high amount of energy. Although you cannot normally see the 10.6 µm beam with your eyes, the focused laser can generate enough heat to cut, engrave, or vaporize suitable materials.
Step 4: Mirrors Guide the Laser Beam
After leaving the laser tube, the beam needs to travel to the cutting head.
The laser tube and cutting area do not usually sit in a straight optical path, so the machine uses reflective mirrors to redirect the beam.
Many common CO2 laser machines use three external mirrors.
- First mirror: Changes the direction of the beam after it leaves the laser tube.
- Second mirror: Redirects the beam along the moving gantry.
- Third mirror: Directs the beam downward toward the focusing assembly.
The mirrors need proper alignment. If the optical path becomes misaligned, the beam may not enter the focusing lens correctly. This can cause uneven cutting, reduced power at the work area, or differences in cutting performance across the machine bed.
For this reason, mirror alignment is an important part of CO2 laser machine maintenance.
Step 5: The Focusing Lens Concentrates the Beam
After the mirrors guide the beam to the laser head, the beam passes through the focusing lens.
The lens concentrates the laser energy into a very small focal spot on the material.
The basic process looks like this:
- The laser beam enters the focusing lens.
- The lens changes the path of the light rays.
- The beam converges toward the focal point.
- The energy becomes highly concentrated at that point.
- The concentrated energy heats the material rapidly.
You can think of this concept like focusing sunlight through a magnifying glass. Concentrating energy into a smaller area creates much greater heating at that point.
The actual laser spot depends on factors such as the lens focal length, beam quality, optical alignment, and lens condition.
The focus height also matters. If the material sits too far above or below the correct focal position, the machine may produce wider cuts, rougher edges, incomplete cuts, or excessive burning.
Step 6: The Material Absorbs the Laser Energy
Once the focused laser beam reaches the material, the material absorbs part of the laser’s infrared energy.
The temperature at the cutting point rises extremely quickly.
Depending on the material, thickness, laser power, speed, focus, and other settings, the laser can:
- Vaporize material
- Melt material
- Burn material
- Thermally decompose material
- Remove material during engraving
The machine does not use a physical blade to make the cut. Instead, the focused laser energy removes material along a controlled path.
For example, when cutting MDF or wood, the laser heats and removes the material while the air-assist system helps clear smoke and debris from the cutting zone.
Different materials absorb laser energy differently, so the correct power and speed settings can vary significantly from one material to another.
Step 7: Air Assist Keeps the Cutting Area Clean
Laser cutting produces smoke, fumes, and small particles. The machine uses air assist to direct a controlled stream of air toward the cutting point.
A nozzle near the focusing lens directs the airflow onto the material.
Air assist helps to:
- Remove smoke from the cutting area
- Clear debris from the cut
- Reduce excessive burning
- Improve edge quality
- Keep the cutting zone cleaner
- Reduce contamination of the focusing lens
- Reduce the chance of small flare-ups
The correct air pressure depends on the material, thickness, nozzle design, and cutting application.
Too little airflow may allow excessive smoke and heat to build up around the cut. The appropriate airflow helps the machine achieve more consistent cutting results.
Step 8: The Motion System Moves the Laser Head
While the laser processes the material, the machine’s motion system moves the laser head along the programmed path.
Several mechanical components work together to create this movement, including:
- Stepper or servo motors
- Motor drivers
- Timing belts
- Linear guide rails
- Bearings or linear blocks
- Gantry assemblies
The controller sends signals to the motor drivers, which control the motors. The motors then move the laser head through the machine’s X and Y axes.
The controller continuously coordinates these movements with laser firing.
This allows the machine to create:
- Straight lines
- Curves
- Circles
- Small text
- Detailed patterns
- Complex shapes
- Repeated production designs
In many CO2 laser machines, the material stays stationary while the laser head moves across the working area.
Step 9: The Cooling System Protects the Laser Tube
A CO2 laser tube generates considerable heat during operation. The machine therefore needs an effective cooling system to maintain a suitable operating temperature.
Many glass-tube CO2 laser machines use water cooling.
A water pump circulates coolant through the cooling jacket around the laser tube. More advanced machines often use a dedicated water chiller to control the coolant temperature more consistently.
The cooling system helps to:
- Remove excess heat
- Prevent the laser tube from overheating
- Maintain more stable laser performance
- Reduce thermal stress
- Extend the useful life of the laser tube
Stable cooling becomes especially important during long cutting and engraving jobs.
Operators should follow the laser tube and chiller manufacturer’s recommended temperature range and coolant requirements.
Step 10: The Exhaust System Removes Smoke and Fumes
Laser cutting and engraving can produce smoke, fumes, odors, and fine particles.
The machine’s exhaust system removes these by-products from the cutting enclosure.
A typical exhaust system includes an exhaust fan, ducting, and an outlet or filtration arrangement, depending on the machine setup.
A properly designed exhaust system helps provide:
- Better visibility inside the machine
- Less smoke around the work area
- Reduced odor
- Cleaner machine components
- Better working conditions
Smoke can also settle on optical components over time. Keeping the enclosure and optical path clean helps maintain consistent machine performance.
Always provide appropriate ventilation and follow the safety requirements for the materials you process.
Why Does the Focus Point Matter?
The focus point plays a major role in CO2 laser cutting quality.
The focusing lens concentrates the beam at a specific distance from the lens. If the material sits too high or too low, the beam will not reach the material at its ideal focal position.
An incorrect focus can cause:
- Rougher cutting edges
- Wider kerf
- Incomplete cuts
- Excessive burning
- Reduced cutting efficiency
- Lower engraving detail
Correct focus helps create a smaller and more concentrated cutting spot.
For this reason, operators should check the focus whenever they change material thickness or use a different cutting setup.
What Determines CO2 Laser Cutting Quality?
A clean laser cut does not depend on laser power alone. Several factors work together to determine the final result.
Important factors include:
- Laser power
- Cutting speed
- Focus distance
- Air-assist pressure
- Lens condition
- Mirror alignment
- Material type
- Material thickness
- Material quality
- Number of passes
- Machine calibration
- Exhaust performance
For example, increasing laser power does not automatically produce a better cut. If the focus, speed, air assist, or optical alignment is incorrect, even a high-power laser can produce poor results.
The best results come from balancing the machine settings with the material and thickness being processed.
How the Complete CO2 Laser Cutting Process Works
Now that we have looked at each stage individually, the complete process can be summarized as follows:
Design → Laser Software → Controller → Laser Tube → Mirrors → Focusing Lens → Material → Air Assist + Exhaust
At the same time, the motion system and cooling system continuously support the cutting process.
The design tells the machine where to move. The controller coordinates the movement and laser output. The laser tube generates the beam, the mirrors guide it, and the focusing lens concentrates it onto the material. Air assist clears the cutting area, while the exhaust system removes smoke and fumes. Meanwhile, the cooling system keeps the laser tube operating within its required temperature range.
All of these systems must work together to produce a clean and accurate result.
For a complete explanation, read our guide: CO2 Laser Machine Parts Explained
Conclusion
A CO2 laser cutting machine combines laser technology, optics, electronics, precision mechanics, cooling, air assist, exhaust, and software into one complete system.
The process starts with a digital design and ends with a precise cut or engraving on the material. Between these two points, the controller manages machine movement, the laser tube generates the beam, mirrors guide it, and the focusing lens concentrates the energy onto a very small area.
Understanding how a CO2 laser cutting machine works can help both beginners and experienced operators get better results. It also makes troubleshooting easier because you can understand how problems with focus, mirror alignment, laser power, cooling, air assist, or machine movement can affect the final cut.
Once you understand the complete process, operating and maintaining a CO2 laser machine becomes much easier.
Frequently Asked Questions About CO2 Laser Cutting Machines
Q1. Does the laser beam physically touch the material?
No. The laser does not physically contact the material like a blade or drill. Instead, the focused laser beam transfers energy to the material and removes it through intense localized heating.
Q2. Why are mirrors important in a CO2 laser machine?
Mirrors guide the laser beam from the laser tube to the laser head. Proper alignment ensures that the beam follows the correct optical path and enters the focusing lens correctly.
Q3. What happens if the laser focus is incorrect?
An incorrect focus can reduce energy concentration at the material surface. This may result in rough edges, incomplete cuts, excessive burning, wider kerf, or reduced engraving detail.
Q4. Why does a CO2 laser machine need air assist?
Air assist directs airflow toward the cutting point. It helps remove smoke and debris, reduces excessive burning, keeps the cutting area cleaner, and helps protect the focusing lens from contamination.
Q5. Does the material move during laser cutting?
In most conventional CO2 laser cutting machines, the material remains stationary while the laser head moves along the X and Y axes. Some specialized machines use different motion systems or moving tables.
Q6. Why does a CO2 laser tube need water cooling?
A CO2 laser tube produces heat during operation. Water cooling removes this heat and helps maintain the tube within its recommended operating temperature range.
Q7. What materials can a CO2 laser cutting machine cut?
CO2 laser machines commonly process materials such as wood, MDF, plywood, acrylic, leather, paper, cardboard, fabric, rubber, and other suitable non-metal materials. The exact materials depend on the machine, material composition, thickness, and manufacturer’s recommendations.
Q8. Can a CO2 laser cut metal?
Standard glass-tube CO2 laser machines are generally designed for non-metal materials. Specialized industrial CO2 laser systems can process certain metals under appropriate conditions, but this differs significantly from the capabilities of typical hobby and small-business CO2 laser machines.
Q9. What is the most important setting for laser cutting?
There is no single setting that determines cutting quality. Power, speed, focus, air assist, material type, thickness, optical alignment, and machine condition all affect the final result.
Q10. Why does my CO2 laser cut well in one area but poorly in another?
Uneven cutting across the working area can result from several issues, including optical misalignment, incorrect focus height, mechanical alignment problems, lens or mirror contamination, or inconsistent material thickness. Checking the optical path and focus across the working area can help identify the cause.